Vue3 + TypeScript
使用Vue3+ TypeScript打造一个企业级组件库
1.目录结构§
- 项目结构
- 开发模式讲解
- Vue3的定义
- 单元测试
- 高泛用性的API
- 响应式原理
- 完善功能开发
- 自动化发布流程
2.启动项目准备工作§
1.Vue3更新概览§
- vue RFCS
- slot Api 的变化
- 可通过#header 代表具名插槽
- 全局 Api的变化
- 直接通过import 导入即可
- Compontent-Api
2.使用vue-cli创建TS项目§
- 安装vue-cli
cnpm i -g @vue/cli - 创建项目
vue create project - 配置项目(TS版本)
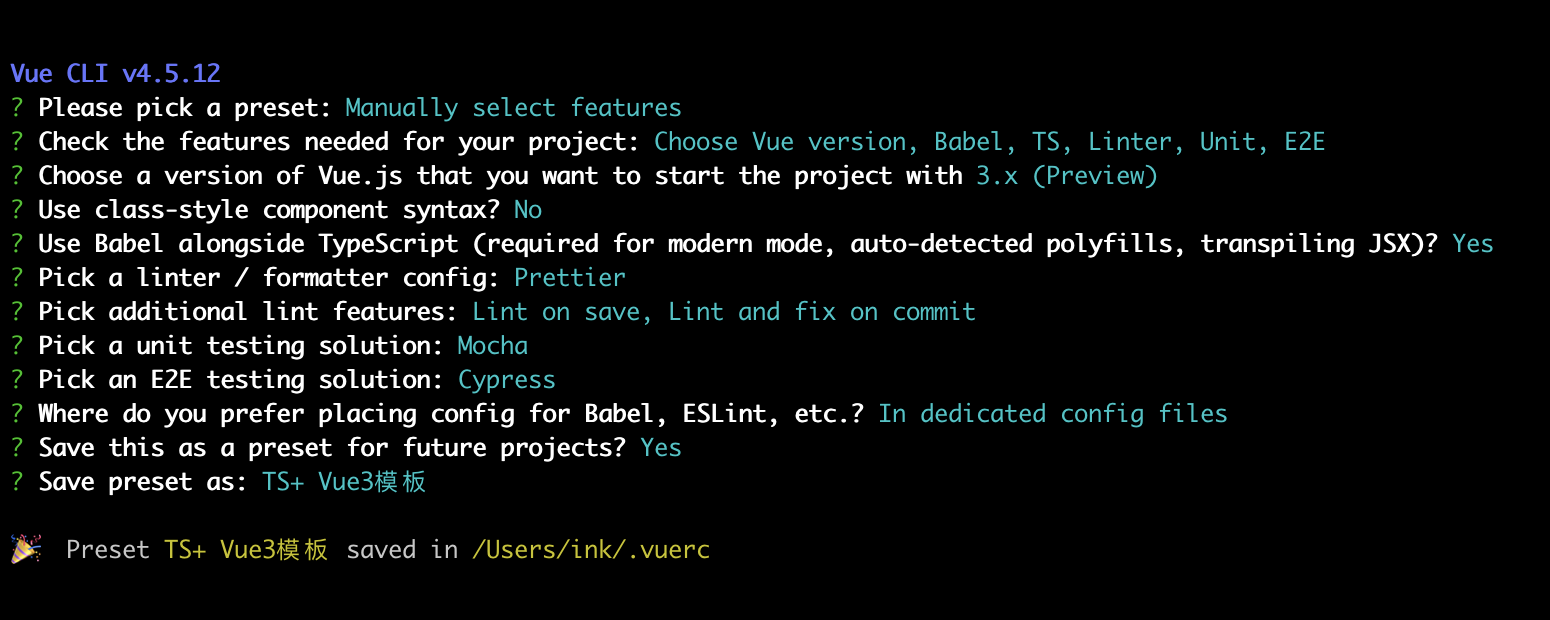
3.格式化工具prettier§
- 在项目中创建.prettierrc文件
- 配置
{ "semi": false, (不需要分号) "singleQuote": true, (单引号) "arrowParens": "always", (剪头函数需要()) "trailingComma": "all" (结尾以','结束) } - 使用
- 打开设置, 搜索formatter,
- 勾选 Editor: Format On Save 即可(在工作区而不是在user)
4.h函数的详情解读§
- 可使用import的方式导入api
import { createApp, h } from 'vue' createApp(App).mount('#app') - h函数类似react的createElement, 接收三个参数, h(节点类型,节点属性,children选项))
<div id="app"> <img src="/images/h.png" alt=""/> <HelloWorld msg="xasdadas" :age="12" /> </div> 使用h函数可转换成如下代码 const img = require('/images/h.png') // eslint-disable-line const App = defineComponent({ render({ return h('div', { id: 'app' }, [ h('img', { alt: '', src: img }), h(HelloWord, { msg: 'xasdadas', age: 12 }) ]) }) }) - 图片导入这块的可通过require的方式进行导入,如果遇到eslint的报错,可使用// eslint-diasble-line
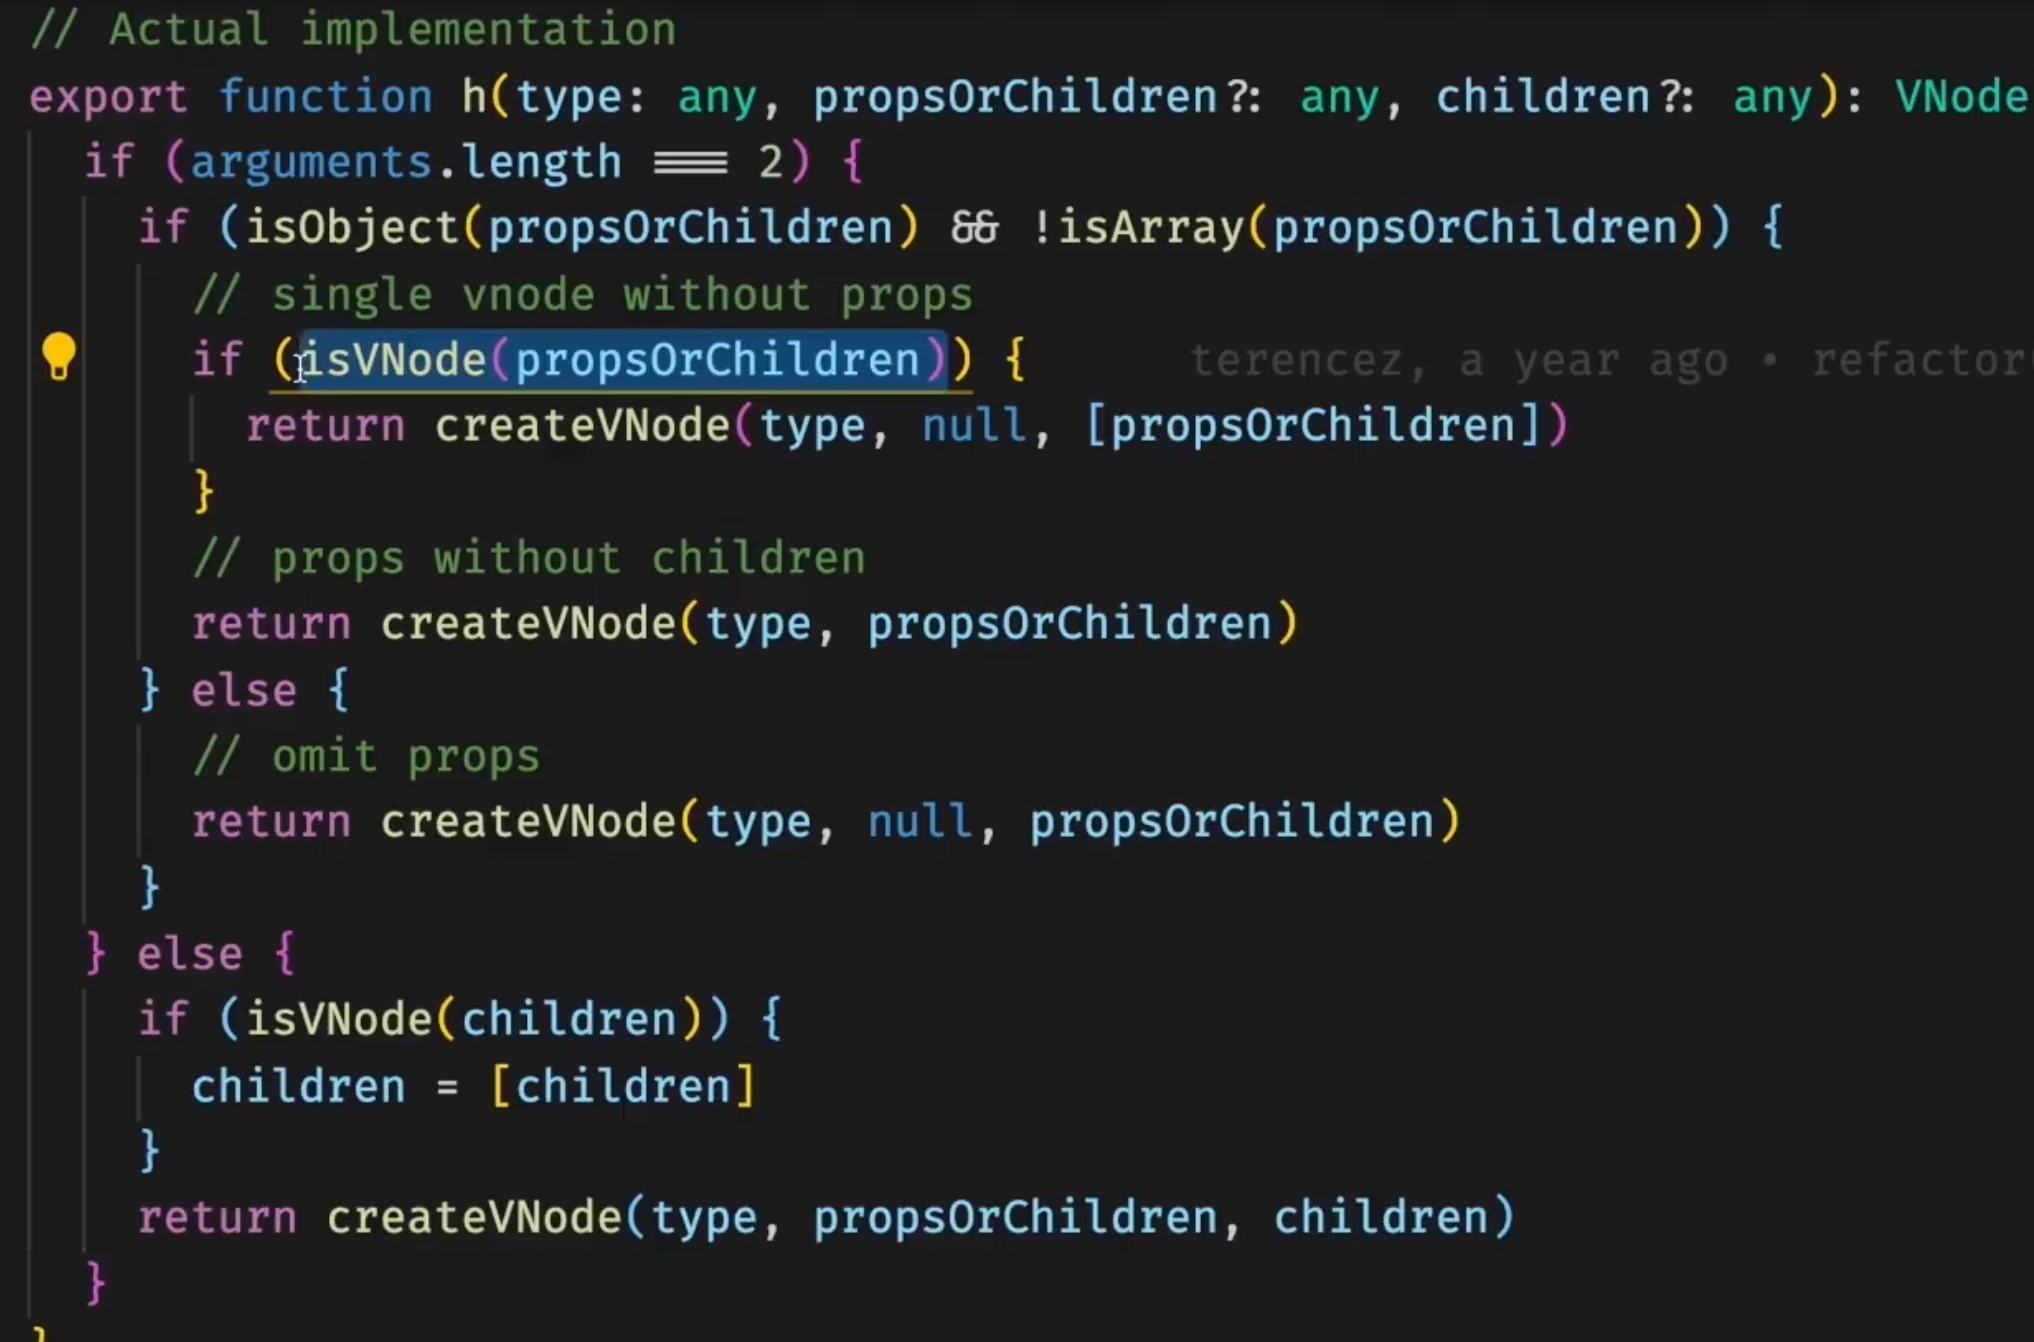
- h函数源码解析
- watchEffect注意点
watchEffect(() => {
  console.log(h.value) //只监听这个h的值的变化
})
5.使用jsx开发vue3组件§
- 如何改造
- 下载依赖
yarn add @vue/babel-plugin-jsx -D- 在babel.config.js中配置
module.exports = { plugins: ["@vue/babel-plugin-jsx"], }- 创建一个.tsx结尾的文件
import { defineComponent, reactive } from 'vue' import HelloWord from './HelloWorld' function renderHelloWord(num: number) { return <HelloWord age={num} /> } export default defineComponent({ setup() { return () => { const state = reactive({ name: 2, }) return ( <div> {renderHelloWord(9)} <h1>1231</h1> <p>{state.name}</p> </div> ) } }, }) - 使用tsx的优势
- 使用组件时,可提供eslint的格式化校验
- 变量声明
- 抽离共有逻辑,更加灵活
import { defineComponent } from 'vue'
const PropsType = {
  msg: String,
  age: {
    type: Number,
    required: true,
  },
} as const
export default defineComponent({
  props: PropsType,
  setup(props) {
    return () => (
      <div>
        <span>我是你</span>
        {props.age}
      </div>
    )
  },
})
3.Json-schema标准和使用§
1.Ajv校验json-schema§
-
- 下载依赖
yarn add ajv -D -
- 引入ajv
/* eslint-disable */ 在typeScript中使用import会导致报错, 这使用eslint-disable规避require的方式
const Ajv = require('ajv').default
const ajv = new Ajv()
const schema = {
  type: 'object',
  properties: {
    name: {
      type: 'string',
      minLength: 10,
    },
    age: {
      type: 'number',
    },
    record: {
      type: 'array',
      items: [{
          type: 'string'
        },
        {
          type: 'number'
        },
      ]
    }
  }
}
const validate = ajv.compile(schema)
const valid = validate({
  name: '21312311231asddada',
  age: 11,
  record: ['sda', 12131]
})
if (!valid) console.log(validate.errors)
- format自定义ajv
const Ajv = require('ajv').default
const ajv = new Ajv()
ajv.addFormat('test', (data) => {
  return data === 'hhh'
})

name: {
  type: 'string',
  minLength: 10,
  format: 'tset'
},
2.Ajv自定义关键字§
1. 使用validate
   /* eslint-disable */
 const Ajv = require('ajv').default
 const ajv = new Ajv()

 const schema = {
   type: 'object',
   properties: {
     name: {
       type: 'string',
       // minLength: 10,
       // format: 'test',
       test: false,
     },
     age: {
       type: 'number',
     },
     record: {
       type: 'array',
       items: [{
           type: 'string'
         },
         {
           type: 'number'
         },
       ]
     }
   }
 }
 // 自定义关键字
 ajv.addKeyword('test', {
   validate(schema, data) {
     console.log(schema, data)
     if (schema === true) return true
     else return data.length === 6
     return true
   }
 })
 const validate = ajv.compile(schema)
 const valid = validate({
   name: 'hhhs22',
   age: 11,
   record: ['sda', 12131]
 })
 if (!valid) console.log(validate.errors)
1. 使用compile
ajv.addKeyword('test', {
 compile(sche, parentSchema) {
   console.log(sche, parentSchema)
   return () => true
   }
 })
 需要返回函数
1. 使用mataSchema
ajv.addKeyword('test', {
 metaSchema: {
   type: 'string'
   }
 })
 会检测每一个校验的值是否为string类型
3.Ajv自定义错误信息§
  ajv.addKeyword('test', {
    validate: function fun(schema, data) {
      fun.errors = [
        {
          keyword: 'test',
          message: '自定义错误信息'
        }
      ]
    }
  }
4.开发组件库的主流程§
开始实现schema§
一般会创建types文件夹来声明类型§
export enum SchemaTypes {
  'NUMBER' = 'number',
  'STRING' = 'string',
  'INTEGER' = 'interger',
  'OBJECT' = 'object',
  'ARRAY' = 'array',
  'BOOLEAN' = 'boolean',
}

type SchemaRef = { $ref: string }
export interface Schema {
  type: SchemaTypes | string
  const?: any
  format?: string
  default?: any
  properties?: {
    [key: string]: Schema | { $ref: string }
  }
  item?: Schema | Schema[] | SchemaRef
  dependcecies?: {
    [key: string]: string[] | Schema | SchemaRef
  }
  oneOf?: Schema[]
  // vjsf?: VueJsonSchemaConfig
  required?: string[]
  enum?: any[]
  enumKeyvalue?: any[]
  additionalProperties?: any
  additionalItems?: Schema
}
使用vue-jss 可实现css的js化§
import { createUseStyles } from 'vue-jss'
const useStyles = createUseStyles({
  container: {
    display: 'flex',
    flexDirection: 'column',
    height: '100%',
    width: '1200px',
    margin: '0 auto',
  }
})

const classesRef = useStyles()
const classes = classesRef.value
<div class={classes.container}>
</div>
- Captain Janeway
Code§
There are many different ways to style code with GitHub's markdown. If you have inline code blocks, wrap them in backticks: var example = true. If you've got a longer block of code, you can indent with four spaces:
if (isAwesome){
  return true
}
GitHub also supports something called code fencing, which allows for multiple lines without indentation:
if (isAwesome){
  return true
}
And if you'd like to use syntax highlighting, include the language:
if (isAwesome){
  return true
}
Highlight specific lines§
site/
|── dist    # Output directory
|   └── index.html├── pagic.config.ts
└── docs # Source directory └── README.mdTables§
| First Header | Second Header |
|---|---|
| Content from cell 1 | Content from cell 2 |
| Content in the first column | Content in the second column |
Extras§
Pagic supports many extras in markdown.
TeX (KaTeX)§
Inline:
Block: